Authors' Update - keeping journal authors in touch with industry developments, support and training

申し訳ございませんが、お客様のブラウザには完全に対応しておりませんオプションがありましたら、新しいバージョンにアップグレードするか、 Mozilla Firefox、 Microsoft Edge、Google Chrome、またはSafari 14以降をお使いください。これらが利用できない場合、またサポートが必要な場合は、フィードバックをお送りください。
この新ホームページへのフィードバックを歓迎します。ご意見をお寄せください 新しいタブ/ウィンドウで開く
2021年4月5日 | 18 分経過
Angel Borja, PhD別

Editor’s note: This 2014 post conveys the advice of a researcher sharing his experience and does not represent Elsevier’s policy. However, in response to your feedback, we worked with him to update this post so it reflects our practices. For example, since it was published, we have worked extensively with researchers to raise visibility of non-English language research – July 10, 2019
Update: In response to your feedback, we have reinstated the original text so you can see how it was revised. – July 11, 2019
In this monthly series, Dr. Angel Borja draws on his extensive background as an author, reviewer and editor to give advice on preparing the manuscript (author's view), the evaluation process (reviewer's view) and what there is to hate or love in a paper (editor's view).
This article is the second in the series. The first article was: "Six things to do before writing your manuscript."
When you organize your manuscript, the first thing to consider is that the order of sections will be very different than the order of items on you checklist.
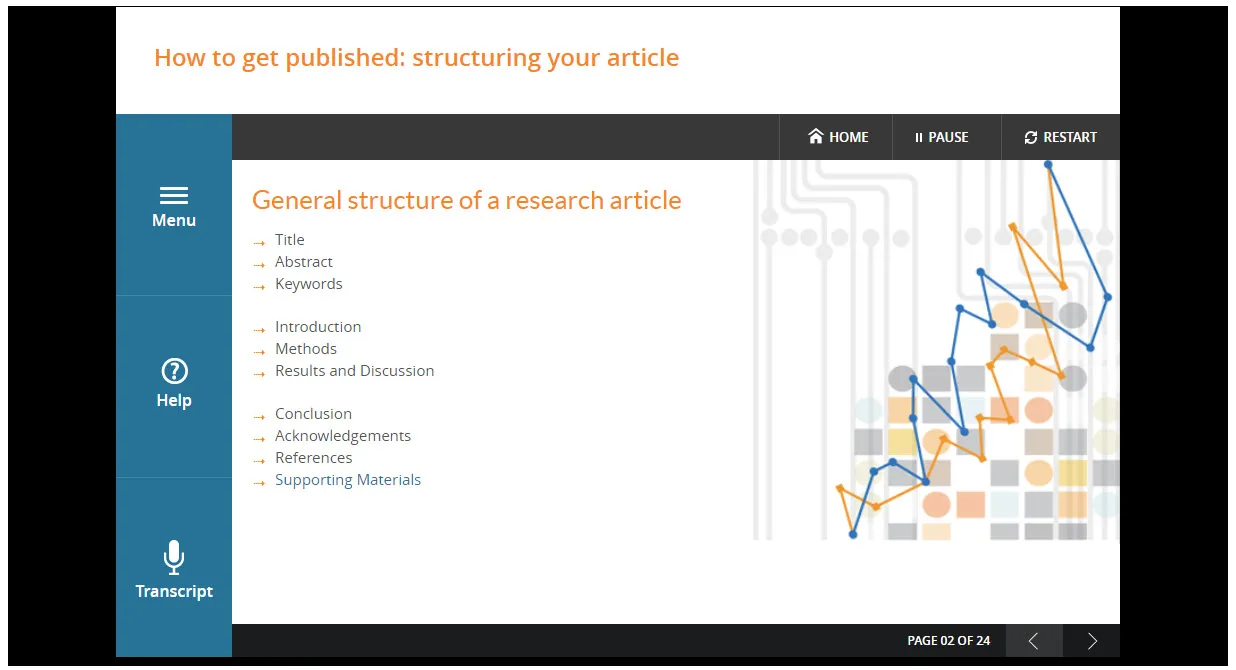
An article begins with the Title, Abstract and Keywords.
The article text follows the IMRAD format 新しいタブ/ウィンドウで開く, which responds to the questions below:
Introduction: What did you/others do? Why did you do it?
Methods: How did you do it?
Results: What did you find?
And
Discussion: What does it all mean?
The main text is followed by the Conclusion, Acknowledgements, References and Supporting Materials.
While this is the published structure, however, we often use a different order when writing.

General strcuture of a research article. Watch a related tutorial on Researcher Academy 新しいタブ/ウィンドウで開く.
Prepare the figures and tables.
Write the Methods.
Write up the Results.
Write the Discussion. Finalize the Results and Discussion before writing the introduction. This is because, if the discussion is insufficient, how can you objectively demonstrate the scientific significance of your work in the introduction?
Write a clear Conclusion.
Write a compelling Introduction.
Write the Abstract.
Compose a concise and descriptive Title.
Select Keywords for indexing.
Write the Acknowledgements.
Write up the References.
Next, I'll review each step in more detail. But before you set out to write a paper, there are two important things you should do that will set the groundwork for the entire process.
The topic to be studied should be the first issue to be solved. Define your hypothesis and objectives (These will go in the Introduction.)
Review the literature related to the topic and select some papers (about 30) that can be cited in your paper (These will be listed in the References.)
Finally, keep in mind that each publisher has its own style guidelines and preferences, so always consult the publisher's Guide for Authors.
Remember that "a figure is worth a thousand words." Hence, illustrations, including figures and tables, are the most efficient way to present your results. Your data are the driving force of the paper, so your illustrations are critical!
How do you decide between presenting your data as tables or figures? Generally, tables give the actual experimental results, while figures are often used for comparisons of experimental results with those of previous works, or with calculated/theoretical values (Figure 1).

Figure 1. An example of the same data presented as table or as figure. Depending on your objectives, you can show your data either as table (if you wish to stress numbers) or as figure (if you wish to compare gradients).
Whatever your choice is, no illustrations should duplicate the information described elsewhere in the manuscript.
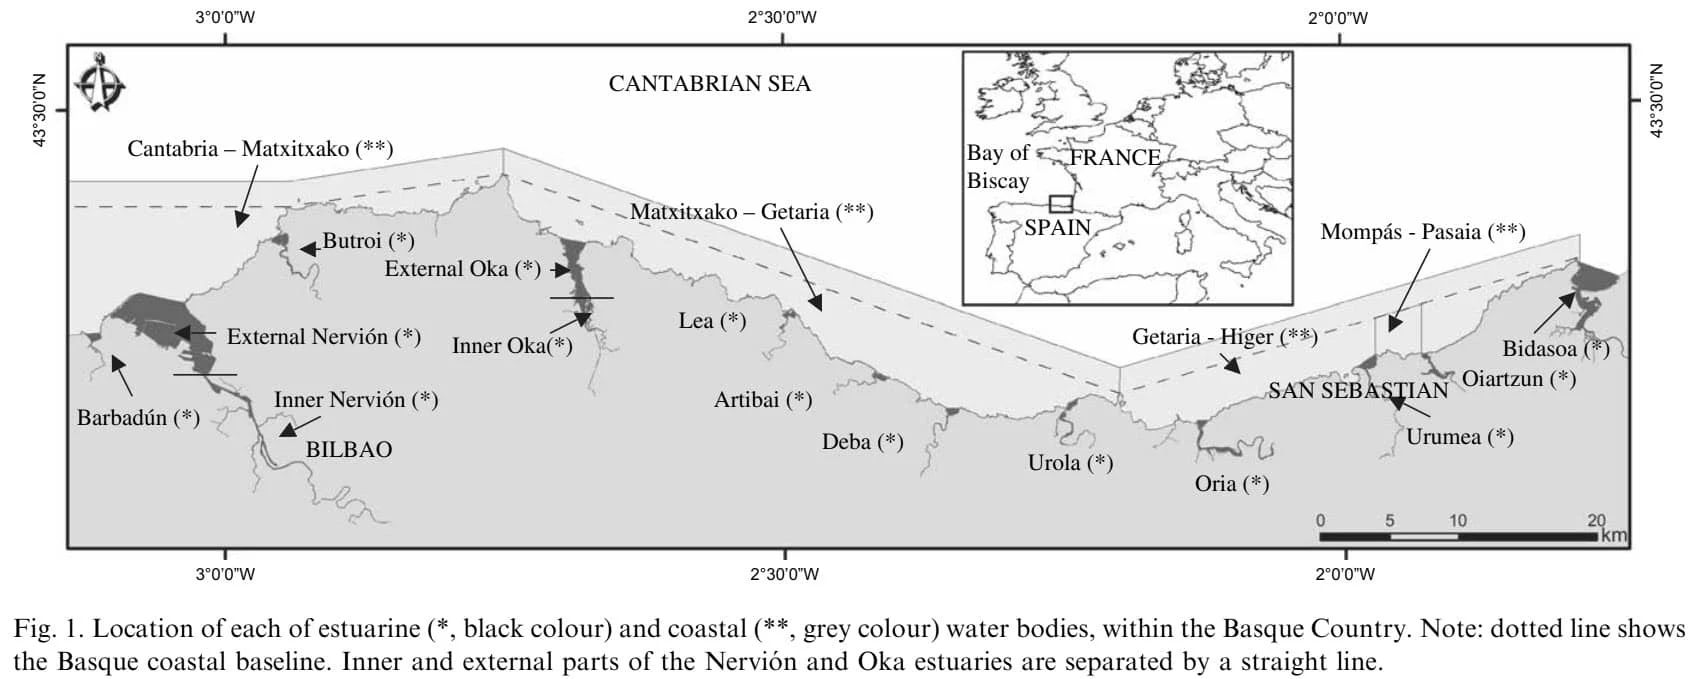
Another important factor: figure and table legends must be self-explanatory (Figure 2)

Figure 2. Figures must be self-explanatory.
When presenting your tables and figures, appearances count! To this end:
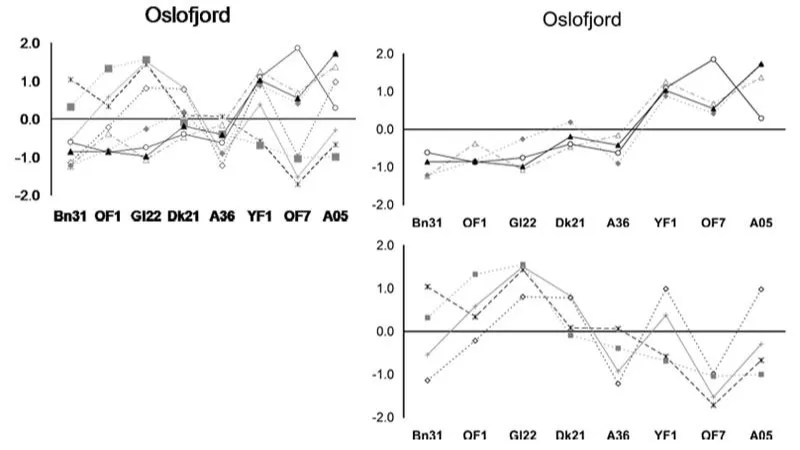
Avoid crowded plots (Figure 3), using only three or four data sets per figure; use well-selected scales.
Think about appropriate axis label size
Include clear symbols and data sets that are easy to distinguish.
Never include long boring tables (e.g., chemical compositions of emulsion systems or lists of species and abundances). You can include them as supplementary material.

Figure 3. Don't clutter your charts with too much data.
If you are using photographs, each must have a scale marker, or scale bar, of professional quality in one corner.
In photographs and figures, use color only when necessary when submitting to a print publication. If different line styles can clarify the meaning, never use colors or other thrilling effects or you will be charged with expensive fees. Of course, this does not apply to online journals. For many journals, you can submit duplicate figures: one in color for the online version of the journal and pdfs, and another in black and white for the hardcopy journal (Figure 4).

Figure 4. Using black and white can save money.
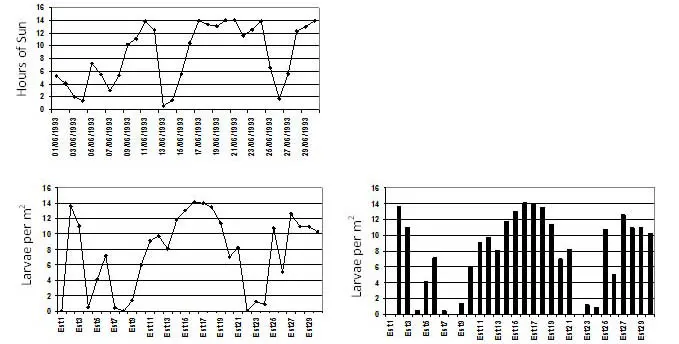
Another common problem is the misuse of lines and histograms. Lines joining data only can be used when presenting time series or consecutive samples data (e.g., in a transect from coast to offshore in Figure 5). However, when there is no connection between samples or there is not a gradient, you must use histograms (Figure 5).

Figure 5. Use the right kind of chart for your data.
Sometimes, fonts are too small for the journal. You must take this into account, or they may be illegible to readers (Figure 6).

Figure 6. Figures are not eye charts - make them large enough too read
Finally, you must pay attention to the use of decimals, lines, etc.
This section responds to the question of how the problem was studied. If your paper is proposing a new method, you need to include detailed information so a knowledgeable reader can reproduce the experiment.
However, do not repeat the details of established methods; use References and Supporting Materials to indicate the previously published procedures. Broad summaries or key references are sufficient.
Reviewers will criticize incomplete or incorrect methods descriptions and may recommend rejection, because this section is critical in the process of reproducing your investigation. In this way, all chemicals must be identified. Do not use proprietary, unidentifiable compounds.
To this end, it's important to use standard systems for numbers and nomenclature. For example:
For chemicals, use the conventions of the International Union of Pure and Applied Chemistry 新しいタブ/ウィンドウで開く and the official recommendations of the IUPAC–IUB Combined Commission on Biochemical Nomenclature 新しいタブ/ウィンドウで開く.
For species, use accepted taxonomical nomenclature (WoRMS: World Register of Marine Species 新しいタブ/ウィンドウで開く, ERMS: European Register of Marine Species 新しいタブ/ウィンドウで開く), and write them always in italics.
For units of measurement, follow the International System of Units (SI).
Present proper control experiments and statistics used, again to make the experiment of investigation repeatable.
List the methods in the same order they will appear in the Results section, in the logical order in which you did the research:
Description of the site
Description of the surveys or experiments done, giving information on dates, etc.
Description of the laboratory methods, including separation or treatment of samples, analytical methods, following the order of waters, sediments and biomonitors. If you have worked with different biodiversity components start from the simplest (i.e. microbes) to the more complex (i.e. mammals)
Description of the statistical methods used (including confidence levels, etc.)
In this section, avoid adding comments, results, and discussion, which is a common error.
Again, look at the journal's Guide for Authors, but an ideal length for a manuscript is 25 to 40 pages, double spaced, including essential data only. Here are some general guidelines:
Title: Short and informative
Abstract: 1 paragraph (<250 words)
Introduction: 1.5-2 pages
Methods: 2-3 pages
Results: 6-8 pages
Discussion: 4-6 pages
Conclusion: 1 paragraph
Figures: 6-8 (one per page)
Tables: 1-3 (one per page)
References: 20-50 papers (2-4 pages)
This section responds to the question "What have you found?" Hence, only representative results from your research should be presented. The results should be essential for discussion.
However, remember that most journals offer the possibility of adding Supporting Materials, so use them freely for data of secondary importance. In this way, do not attempt to "hide" data in the hope of saving it for a later paper. You may lose evidence to reinforce your conclusion. If data are too abundant, you can use those supplementary materials.
Use sub-headings to keep results of the same type together, which is easier to review and read. Number these sub-sections for the convenience of internal cross-referencing, but always taking into account the publisher's Guide for Authors.
For the data, decide on a logical order that tells a clear story and makes it and easy to understand. Generally, this will be in the same order as presented in the methods section.
An important issue is that you must not include references in this section; you are presenting your results, so you cannot refer to others here. If you refer to others, is because you are discussing your results, and this must be included in the Discussion section.
Indicate the statistical tests used with all relevant parameters: e.g., mean and standard deviation (SD): 44% (±3); median and interpercentile range: 7 years (4.5 to 9.5 years).
Use mean and standard deviation to report normally distributed data.
Use median and interpercentile range to report skewed data.
For numbers, use two significant digits unless more precision is necessary (2.08, not 2.07856444).
Never use percentages for very small samples e.g., "one out of two" should not be replaced by 50%.
Here you must respond to what the results mean. Probably it is the easiest section to write, but the hardest section to get right. This is because it is the most important section of your article. Here you get the chance to sell your data. Take into account that a huge numbers of manuscripts are rejected because the Discussion is weak.
You need to make the Discussion corresponding to the Results, but do not reiterate the results. Here you need to compare the published results by your colleagues with yours (using some of the references included in the Introduction). Never ignore work in disagreement with yours, in turn, you must confront it and convince the reader that you are correct or better.
Take into account the following tips:
Avoid statements that go beyond what the results can support.
Avoid unspecific expressions such as "higher temperature", "at a lower rate", "highly significant". Quantitative descriptions are always preferred (35ºC, 0.5%, p<0.001, respectively).
Avoid sudden introduction of new terms or ideas; you must present everything in the introduction, to be confronted with your results here.
Speculations on possible interpretations are allowed, but these should be rooted in fact, rather than imagination. To achieve good interpretations think about:
How do these results relate to the original question or objectives outlined in the Introduction section?
Do the data support your hypothesis?
Are your results consistent with what other investigators have reported?
Discuss weaknesses and discrepancies. If your results were unexpected, try to explain why
Is there another way to interpret your results?
What further research would be necessary to answer the questions raised by your results?
Explain what is new without exaggerating
Revision of Results and Discussion is not just paper work. You may do further experiments, derivations, or simulations. Sometimes you cannot clarify your idea in words because some critical items have not been studied substantially.
This section shows how the work advances the field from the present state of knowledge. In some journals, it's a separate section; in others, it's the last paragraph of the Discussion section. Whatever the case, without a clear conclusion section, reviewers and readers will find it difficult to judge your work and whether it merits publication in the journal.
A common error in this section is repeating the abstract, or just listing experimental results. Trivial statements of your results are unacceptable in this section.
You should provide a clear scientific justification for your work in this section, and indicate uses and extensions if appropriate. Moreover, you can suggest future experiments and point out those that are underway.
You can propose present global and specific conclusions, in relation to the objectives included in the introduction
This is your opportunity to convince readers that you clearly know why your work is useful.
A good introduction should answer the following questions:
What is the problem to be solved?
Are there any existing solutions?
Which is the best?
What is its main limitation?
What do you hope to achieve?
Editors like to see that you have provided a perspective consistent with the nature of the journal. You need to introduce the main scientific publications on which your work is based, citing a couple of original and important works, including recent review articles.
However, editors hate improper citations of too many references irrelevant to the work, or inappropriate judgments on your own achievements. They will think you have no sense of purpose.
Here are some additional tips for the introduction:
Never use more words than necessary (be concise and to-the-point). Don't make this section into a history lesson. Long introductions put readers off.
We all know that you are keen to present your new data. But do not forget that you need to give the whole picture at first.
The introduction must be organized from the global to the particular point of view, guiding the readers to your objectives when writing this paper.
State the purpose of the paper and research strategy adopted to answer the question, but do not mix introduction with results, discussion and conclusion. Always keep them separate to ensure that the manuscript flows logically from one section to the next.
Hypothesis and objectives must be clearly remarked at the end of the introduction.
Expressions such as "novel," "first time," "first ever," and "paradigm-changing" are not preferred. Use them sparingly.
The abstract tells prospective readers what you did and what the important findings in your research were. Together with the title, it's the advertisement of your article. Make it interesting and easily understood without reading the whole article. Avoid using jargon, uncommon abbreviations and references.
You must be accurate, using the words that convey the precise meaning of your research. The abstract provides a short description of the perspective and purpose of your paper. It gives key results but minimizes experimental details. It is very important to remind that the abstract offers a short description of the interpretation/conclusion in the last sentence.
A clear abstract will strongly influence whether or not your work is further considered.
However, the abstracts must be keep as brief as possible. Just check the 'Guide for authors' of the journal, but normally they have less than 250 words. Here's a good example on a short abstract 新しいタブ/ウィンドウで開く.
In an abstract, the two whats are essential. Here's an example from an article I co-authored in Ecological Indicators 新しいタブ/ウィンドウで開く:
What has been done? "In recent years, several benthic biotic indices have been proposed to be used as ecological indicators in estuarine and coastal waters. One such indicator, the AMBI (AZTI Marine Biotic Index), was designed to establish the ecological quality of European coasts. The AMBI has been used also for the determination of the ecological quality status within the context of the European Water Framework Directive. In this contribution, 38 different applications including six new case studies (hypoxia processes, sand extraction, oil platform impacts, engineering works, dredging and fish aquaculture) are presented."
What are the main findings? "The results show the response of the benthic communities to different disturbance sources in a simple way. Those communities act as ecological indicators of the 'health' of the system, indicating clearly the gradient associated with the disturbance."
The title must explain what the paper is broadly about. It is your first (and probably only) opportunity to attract the reader's attention. In this way, remember that the first readers are the Editor and the referees. Also, readers are the potential authors who will cite your article, so the first impression is powerful!
We are all flooded by publications, and readers don't have time to read all scientific production. They must be selective, and this selection often comes from the title.
Reviewers will check whether the title is specific and whether it reflects the content of the manuscript. Editors hate titles that make no sense or fail to represent the subject matter adequately. Hence, keep the title informative and concise (clear, descriptive, and not too long). You must avoid technical jargon and abbreviations, if possible. This is because you need to attract a readership as large as possible. Dedicate some time to think about the title and discuss it with your co-authors.
Here you can see some examples of original titles, and how they were changed after reviews and comments to them:
Example 1
Original title: Preliminary observations on the effect of salinity on benthic community distribution within a estuarine system, in the North Sea
Revised title: Effect of salinity on benthic distribution within the Scheldt estuary (North Sea)
Comments: Long title distracts readers. Remove all redundancies such as "studies on," "the nature of," etc. Never use expressions such as "preliminary." Be precise.
Example 2
Original title: Action of antibiotics on bacteria
Revised title: Inhibition of growth of Mycobacterium tuberculosis by streptomycin
Comments: Titles should be specific. Think about "how will I search for this piece of information" when you design the title.
Example 3
Original title: Fabrication of carbon/CdS coaxial nanofibers displaying optical and electrical properties via electrospinning carbon
Revised title: Electrospinning of carbon/CdS coaxial nanofibers with optical and electrical properties
Comments: "English needs help. The title is nonsense. All materials have properties of all varieties. You could examine my hair for its electrical and optical properties! You MUST be specific. I haven't read the paper but I suspect there is something special about these properties, otherwise why would you be reporting them?" – the Editor-in-Chief.
Try to avoid this kind of response!
Keywords are used for indexing your paper. They are the label of your manuscript. It is true that now they are less used by journals because you can search the whole text. However, when looking for keywords, avoid words with a broad meaning and words already included in the title.
Some journals require that the keywords are not those from the journal name, because it is implicit that the topic is that. For example, the journal Soil Biology & Biochemistry requires that the word "soil" not be selected as a keyword.
Only abbreviations firmly established in the field are eligible (e.g., TOC, CTD), avoiding those which are not broadly used (e.g., EBA, MMI).
Again, check the Guide for Authors and look at the number of keywords admitted, label, definitions, thesaurus, range, and other special requests.
Here, you can thank people who have contributed to the manuscript but not to the extent where that would justify authorship. For example, here you can include technical help and assistance with writing and proofreading. Probably, the most important thing is to thank your funding agency or the agency giving you a grant or fellowship.
In the case of European projects, do not forget to include the grant number or reference. Also, some institutes include the number of publications of the organization, e.g., "This is publication number 657 from AZTI-Tecnalia."
Typically, there are more mistakes in the references than in any other part of the manuscript. It is one of the most annoying problems, and causes great headaches among editors. Now, it is easier since to avoid these problem, because there are many available tools.
In the text, you must cite all the scientific publications on which your work is based. But do not over-inflate the manuscript with too many references – it doesn't make a better manuscript! Avoid excessive self-citations and excessive citations of publications from the same region.
As I have mentioned, you will find the most authoritative information for each journal’s policy on citations when you consult the journal's Guide for Authors. In general, you should minimize personal communications, and be mindful as to how you include unpublished observations. These will be necessary for some disciplines, but consider whether they strengthen or weaken your paper. You might also consider articles published on research networks 新しいタブ/ウィンドウで開く prior to publication, but consider balancing these citations with citations of peer-reviewed research. When citing research in languages other than English, be aware of the possibility that not everyone in the review process will speak the language of the cited paper and that it may be helpful to find a translation where possible.
You can use any software, such as EndNote 新しいタブ/ウィンドウで開く or Mendeley 新しいタブ/ウィンドウで開く, to format and include your references in the paper. Most journals have now the possibility to download small files with the format of the references, allowing you to change it automatically. Also, Elsevier's Your Paper Your Way program waves strict formatting requirements for the initial submission of a manuscript as long as it contains all the essential elements being presented here.
Make the reference list and the in-text citation conform strictly to the style given in the Guide for Authors. Remember that presentation of the references in the correct format is the responsibility of the author, not the editor. Checking the format is normally a large job for the editors. Make their work easier and they will appreciate the effort.
Finally, check the following:
Spelling of author names
Year of publications
Usages of "et al."
Punctuation
Whether all references are included
In my next article, I will give tips for writing the manuscript, authorship, and how to write a compelling cover letter. Stay tuned!
I have based this paper on the materials distributed to the attendees of many courses. It is inspired by many Guides for Authors of Elsevier journals. Some of this information is also featured in Elsevier's Publishing Connect tutorials. In addition, I have consulted several web pages: https://owl.purdue.edu/ 新しいタブ/ウィンドウで開く, www.physics.ohio-state.edu/~wilkins/writing/index.html.
I want to acknowledge Dr. Christiane Barranguet 新しいタブ/ウィンドウで開く, Executive Publisher of Aquatic Sciences at Elsevier, for her continuous support. And I would like to thank Dr. Alison Bert, Editor-in-Chief of Elsevier Connect; without her assistance, this series would have been impossible to complete.

ABP
